By: T14-2
1. Setting up
Refer to the guide here.
2. Design
2.1. Architecture
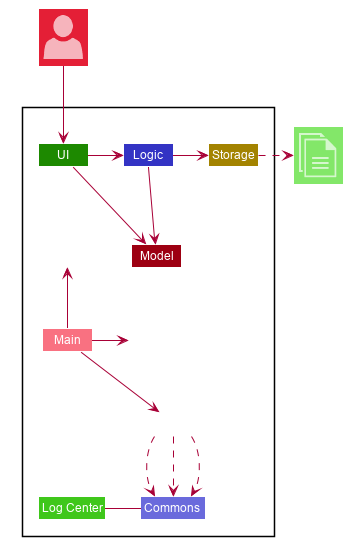
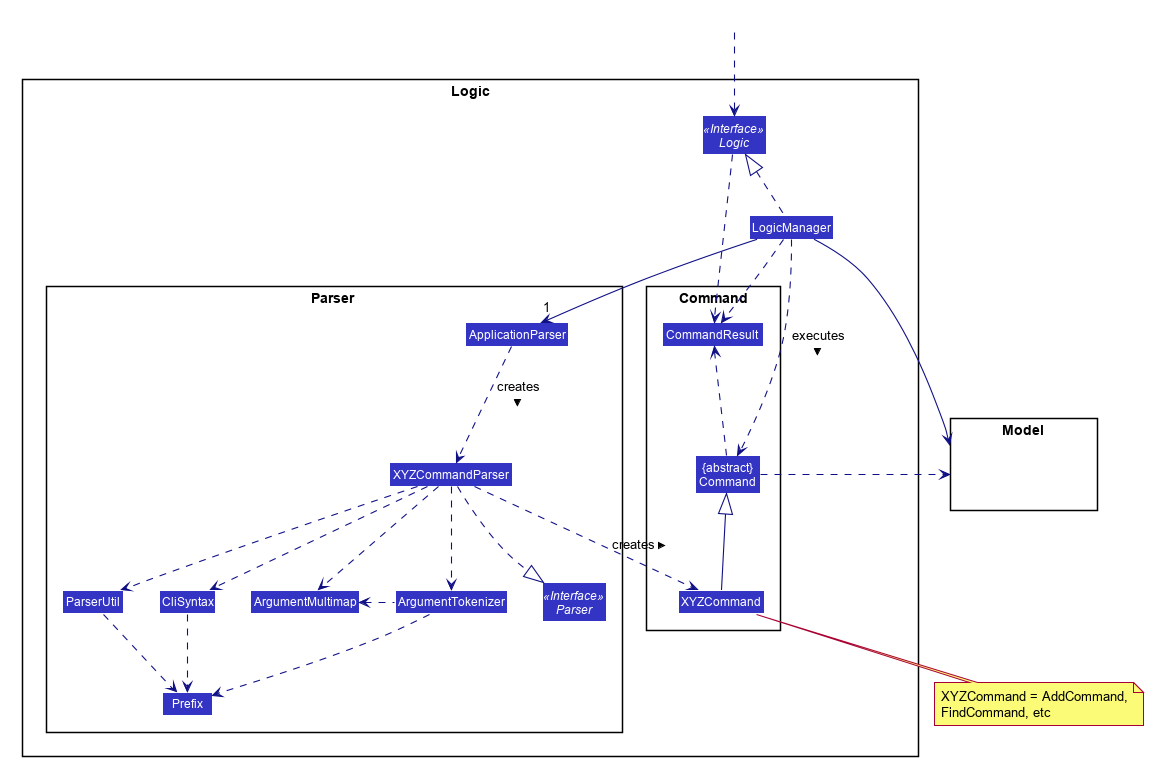
The Architecture Diagram given above explains the high-level design of the App. Given below is a quick overview of each component.
The .puml files used to create diagrams in this document can be found in the diagrams folder.
Refer to the Using PlantUML guide to learn how to create and edit diagrams.
|
-
At app launch: Initializes the components in the correct sequence, and connects them up with each other.
-
At shut down: Shuts down the components and invokes cleanup method where necessary.
Commons represents a collection of classes used by multiple other components.
The following class plays an important role at the architecture level:
-
LogsCenter: Used by many classes to write log messages to the App’s log file.
The rest of the App consists of four components.
Each of the four components
-
Defines its API in an
interfacewith the same name as the Component. -
Exposes its functionality using a
{Component Name}Managerclass.
For example, the Logic component (see the class diagram given below) defines it’s API in the Logic.java interface and exposes its functionality using the LogicManager.java class.
How the architecture components interact with each other
The Sequence Diagram below shows how the components interact with each other for the scenario where the user issues the command deleteStudent 1.
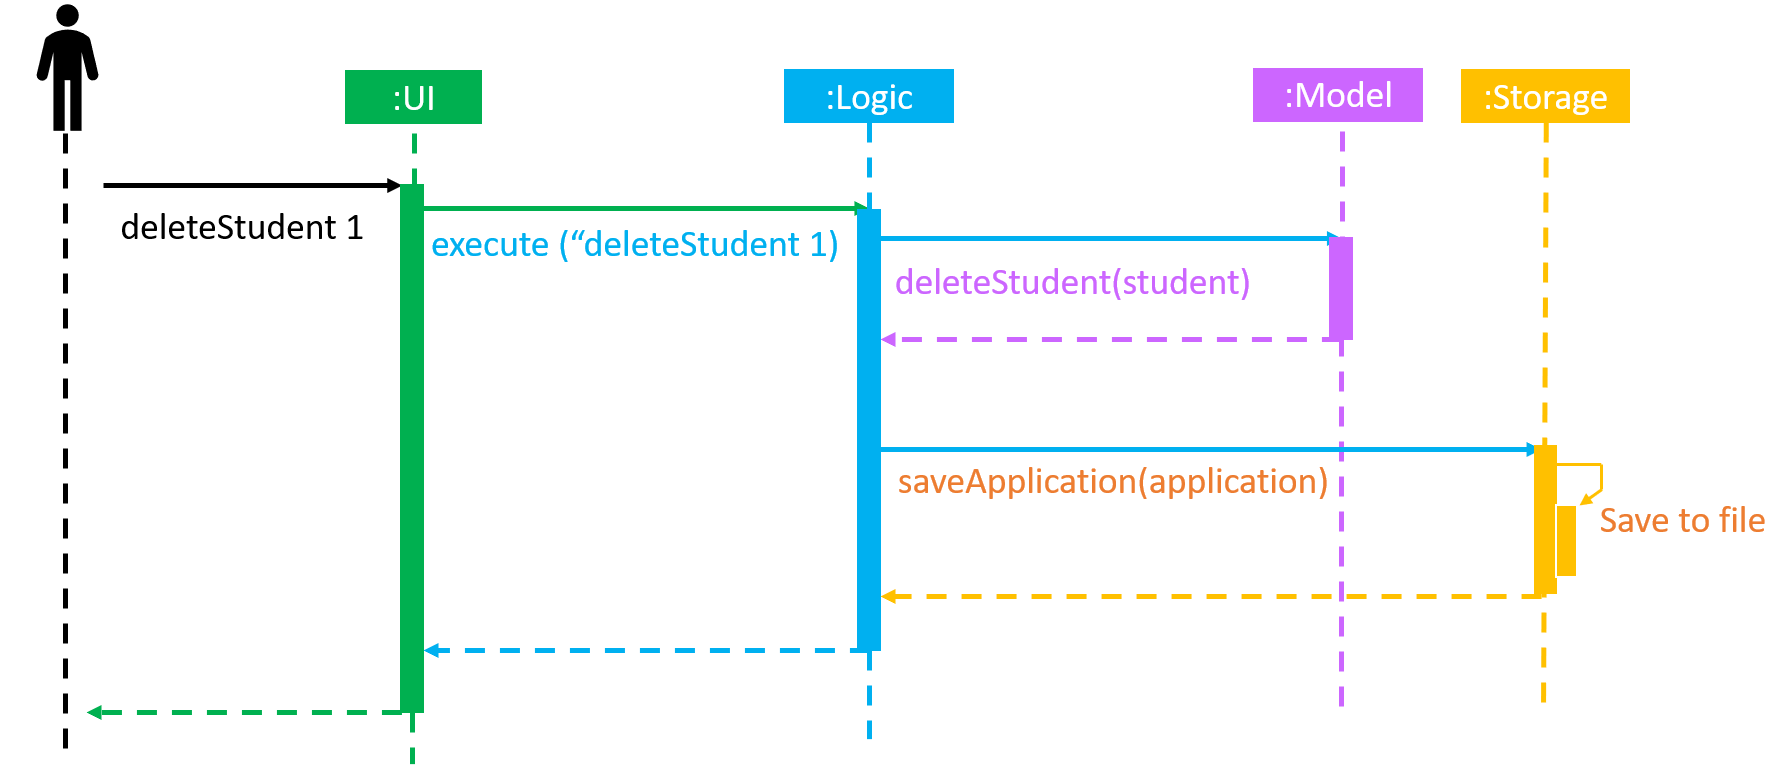
deleteStudent 1 commandThe sections below give more details of each component.
2.2. UI component
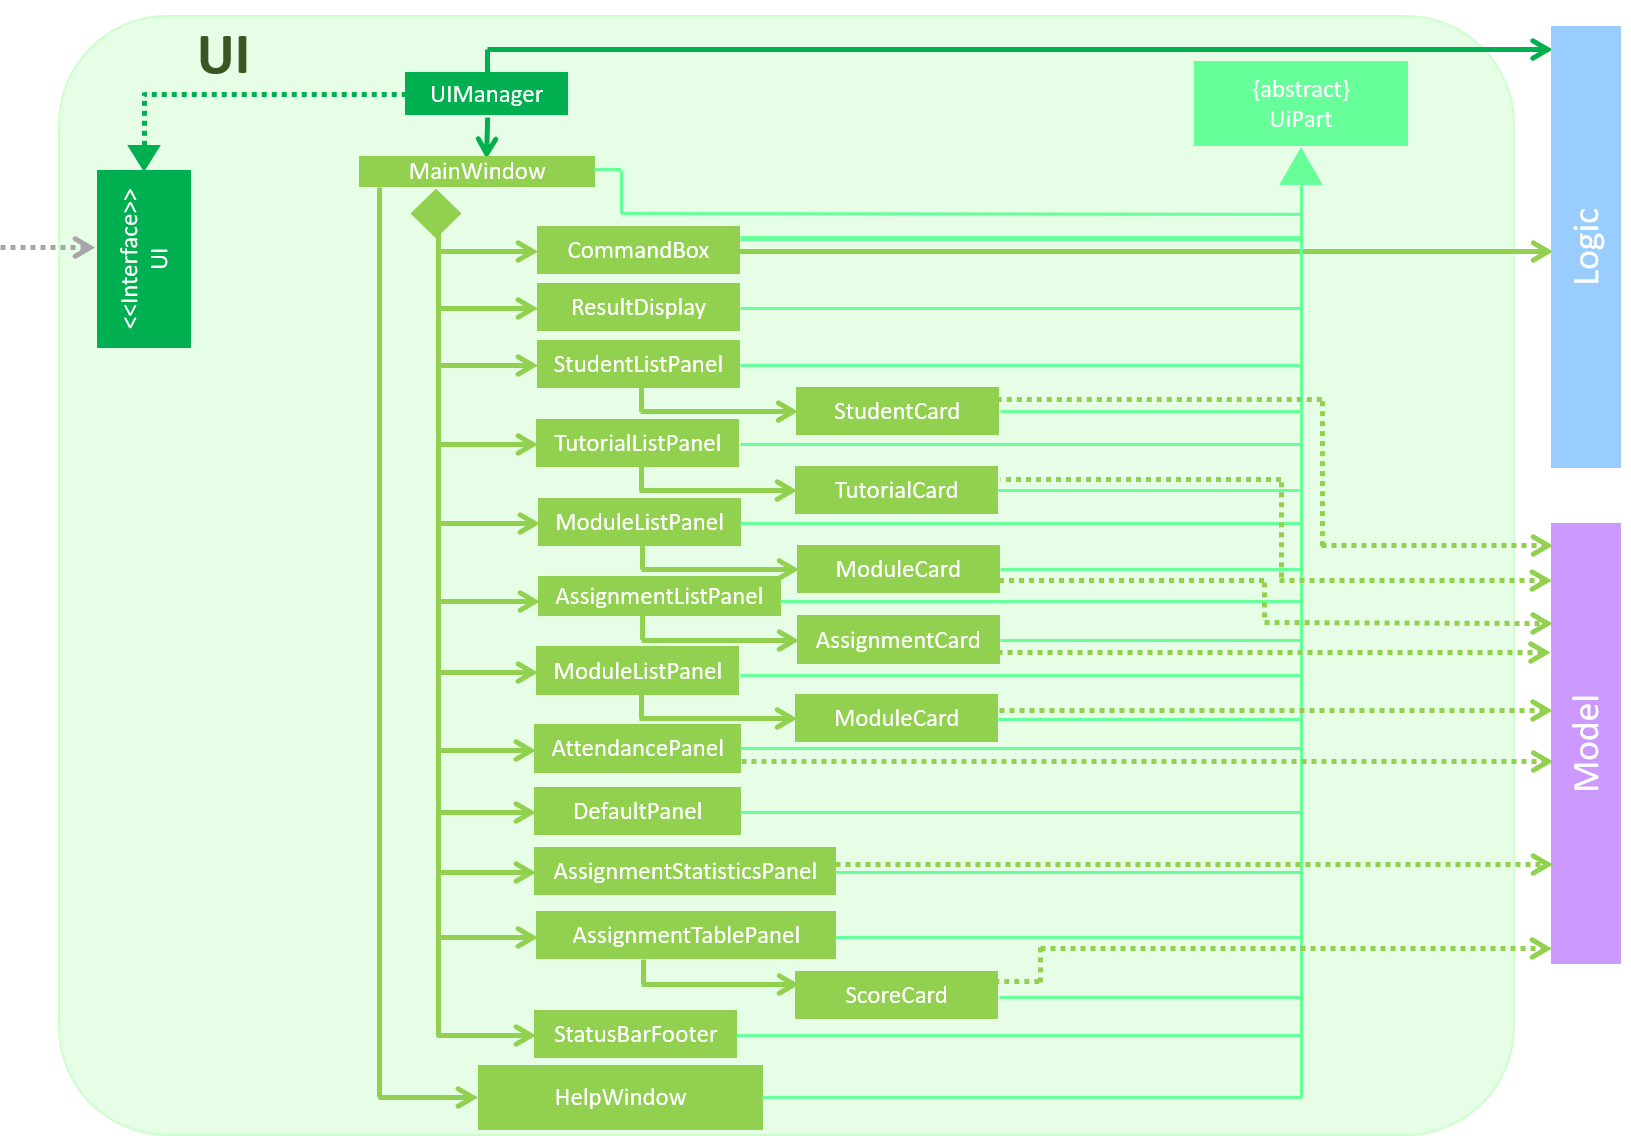
API : Ui.java
The UI consists of a MainWindow that is made up of parts e.g.CommandBox, ResultDisplay, PersonListPanel, StatusBarFooter etc. All these, including the MainWindow, inherit from the abstract UiPart class.
The UI component uses JavaFx UI framework. The layout of these UI parts are defined in matching .fxml files that are in the src/main/resources/view folder. For example, the layout of the MainWindow is specified in MainWindow.fxml
The UI component,
-
Executes user commands using the
Logiccomponent. -
Listens for changes to
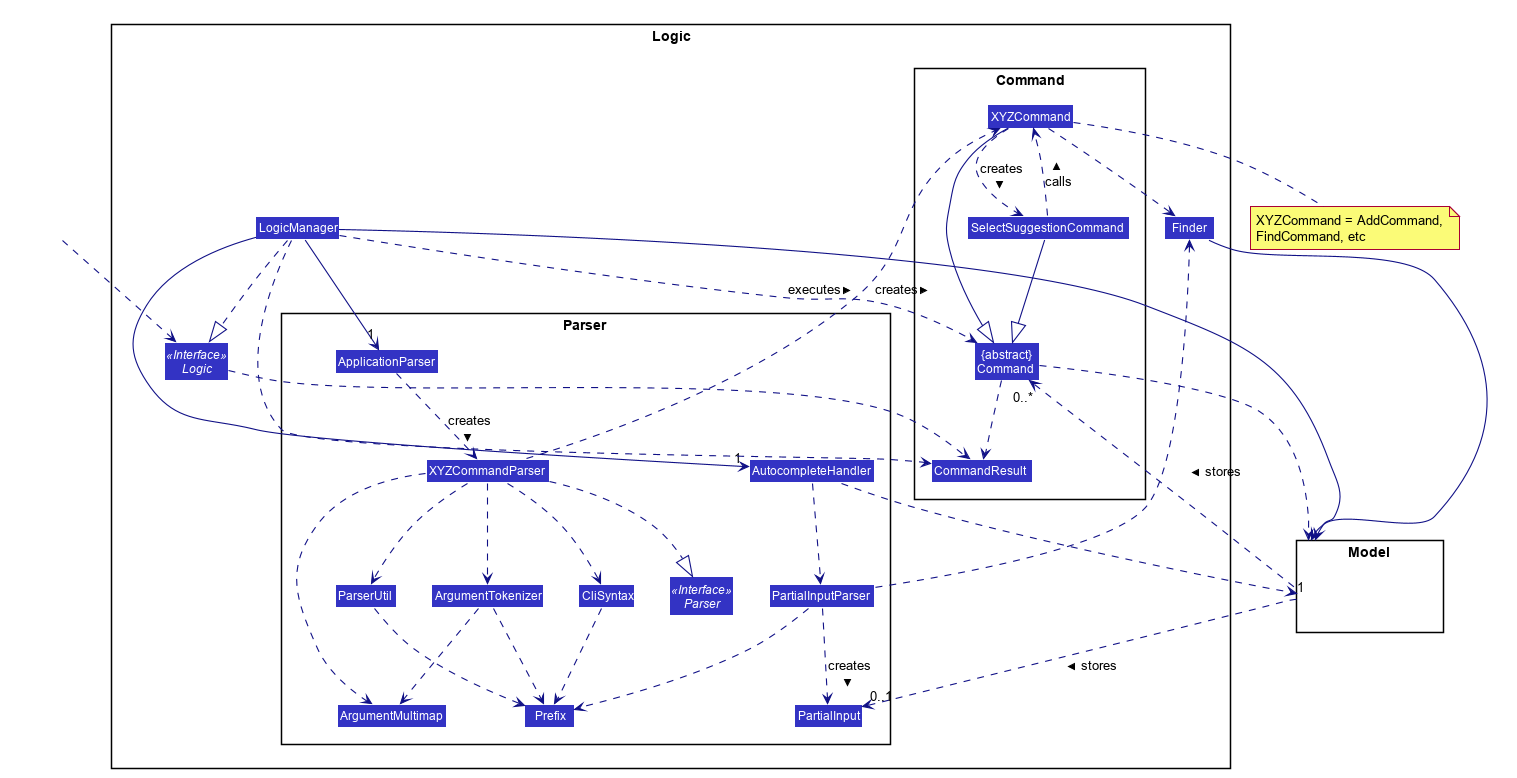
Modeldata so that the UI can be updated with the modified data. === Logic component
API :
Logic.java
-
Logicuses theApplicationParserclass to parse the user command. -
This results in a
Commandobject which is executed by theLogicManager. -
The command execution can affect the
Model(e.g. adding a person). -
The result of the command execution is encapsulated as a
CommandResultobject which is passed back to theUi. -
In addition, the
CommandResultobject can also instruct theUito perform certain actions, such as displaying help to the user.
Given below is the Sequence Diagram for interactions within the Logic component for the execute("deleteStudent i/1") API call.
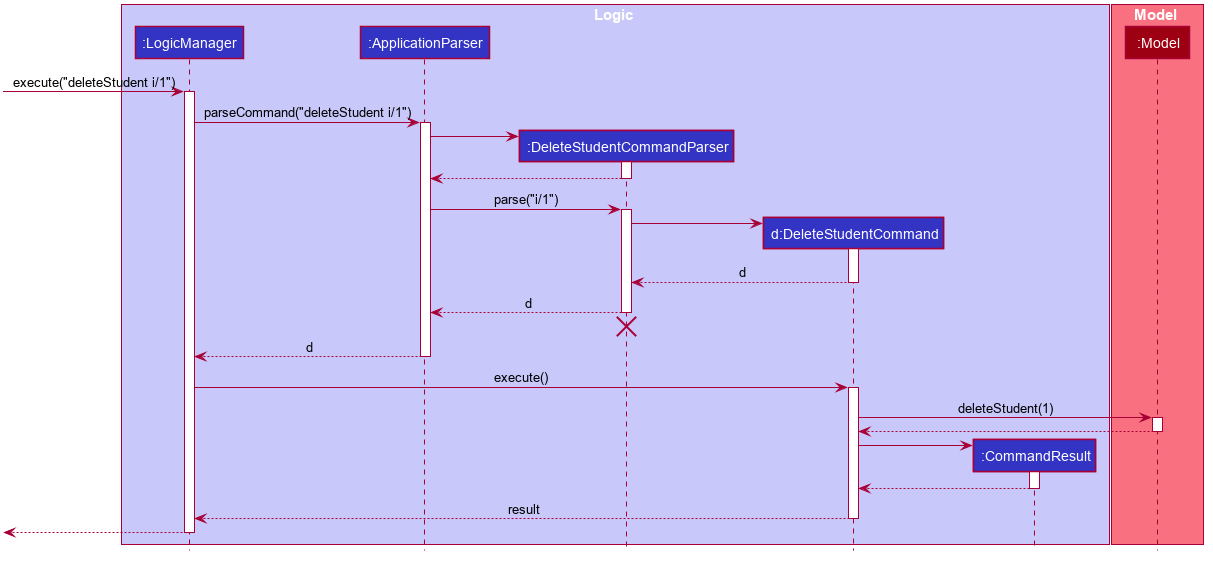
deleteStudent i/1 Command
The lifeline for DeleteCommandParser should end at the destroy marker (X) but due to a limitation of PlantUML, the lifeline reaches the end of diagram.
|
Besides these main commands, Logic also handles autocorrect and autocomplete functions in response to user input. These are described in sections 3.1 and 3.2 respectively.
2.3. Model component
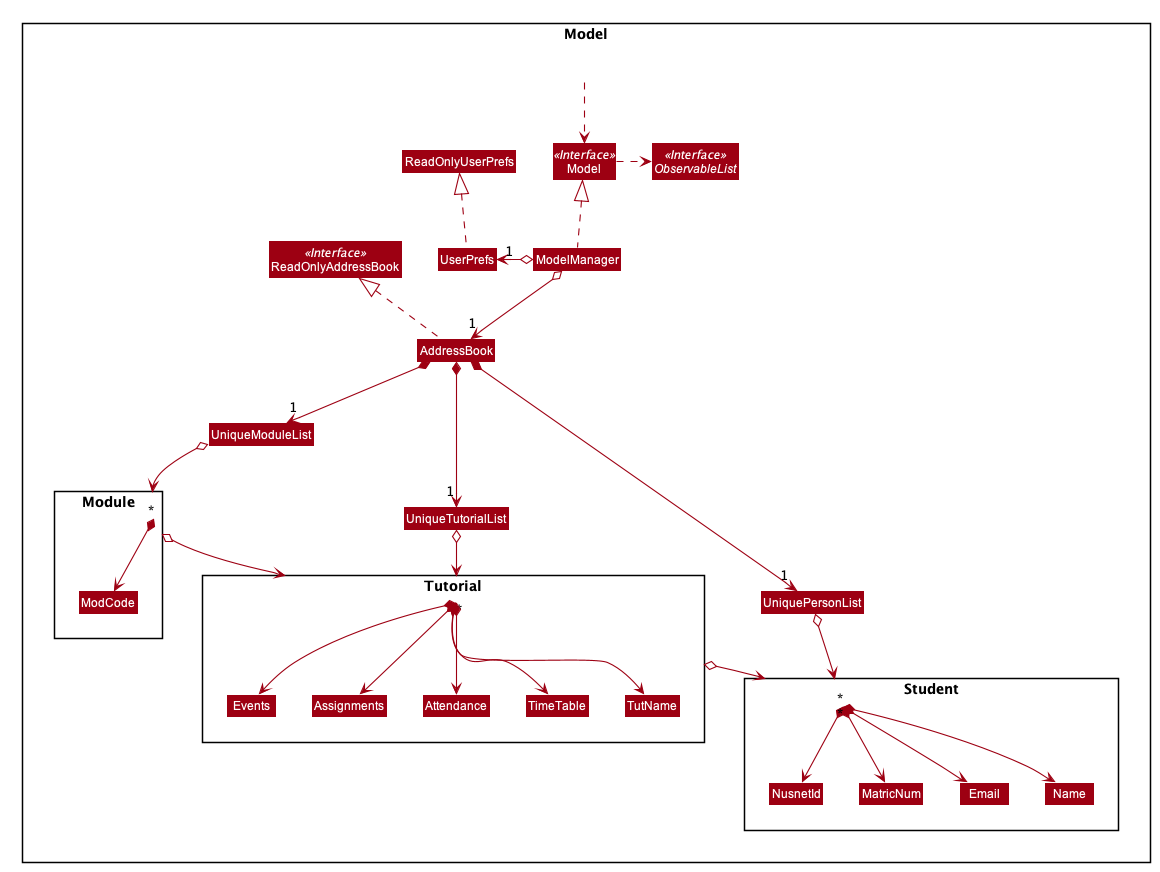
API : Model.java
The Model,
-
stores a
UserPrefobject that represents the user’s preferences. -
stores the Address Book data.
-
exposes an unmodifiable
ObservableList<Student>that can be 'observed' -
exposes an unmodifiable
ObservableList<Tutorial>that can be 'observed' -
exposes an unmodifiable
ObservableList<Module>that can be 'observed' -
does not depend on any of the other three components. === Storage component
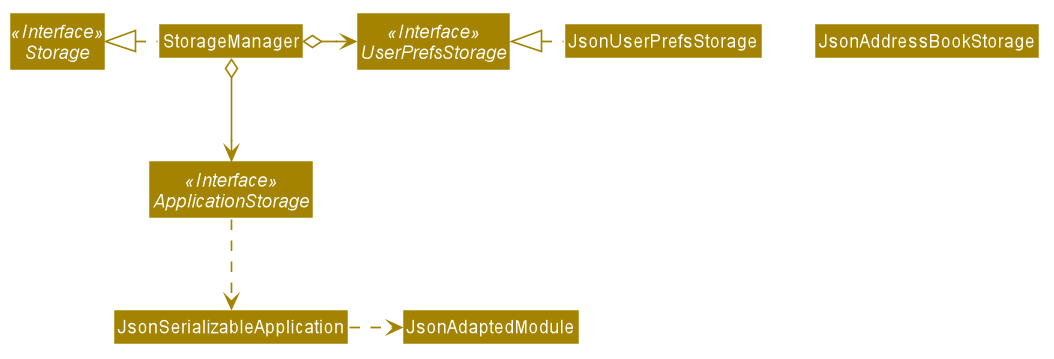
API : Storage.java
The Storage component,
-
can save
UserPrefobjects in json format and read it back. -
can save the
T.A.renceapplication data in json format and read it back.
2.3.1. Implementation
When the application is being saved, a list of modules will be serialized into a Json object and written to the file.
2.3.2. Design Considerations
Although the application has 3 core components (modules, tutorials and students), to prevent redundant data being written and save on storage space, only the modules will be serialized and saved.
This is as the information encapsulated in modules can be used to instantiate tutorial and student objects.
A key assumption here is that during the operational usage of the application, data stored in the tutorials and students objects correspond to the module object. Ie there are no tutorials or student objects which exist without a corresponding module object.
Future versions of storage will support saving of Assignment objects.
2.4. Common classes
Classes used by multiple components are in the seedu.tarence.commons package.
3. Implementation
This section describes some noteworthy details on how certain features are implemented.
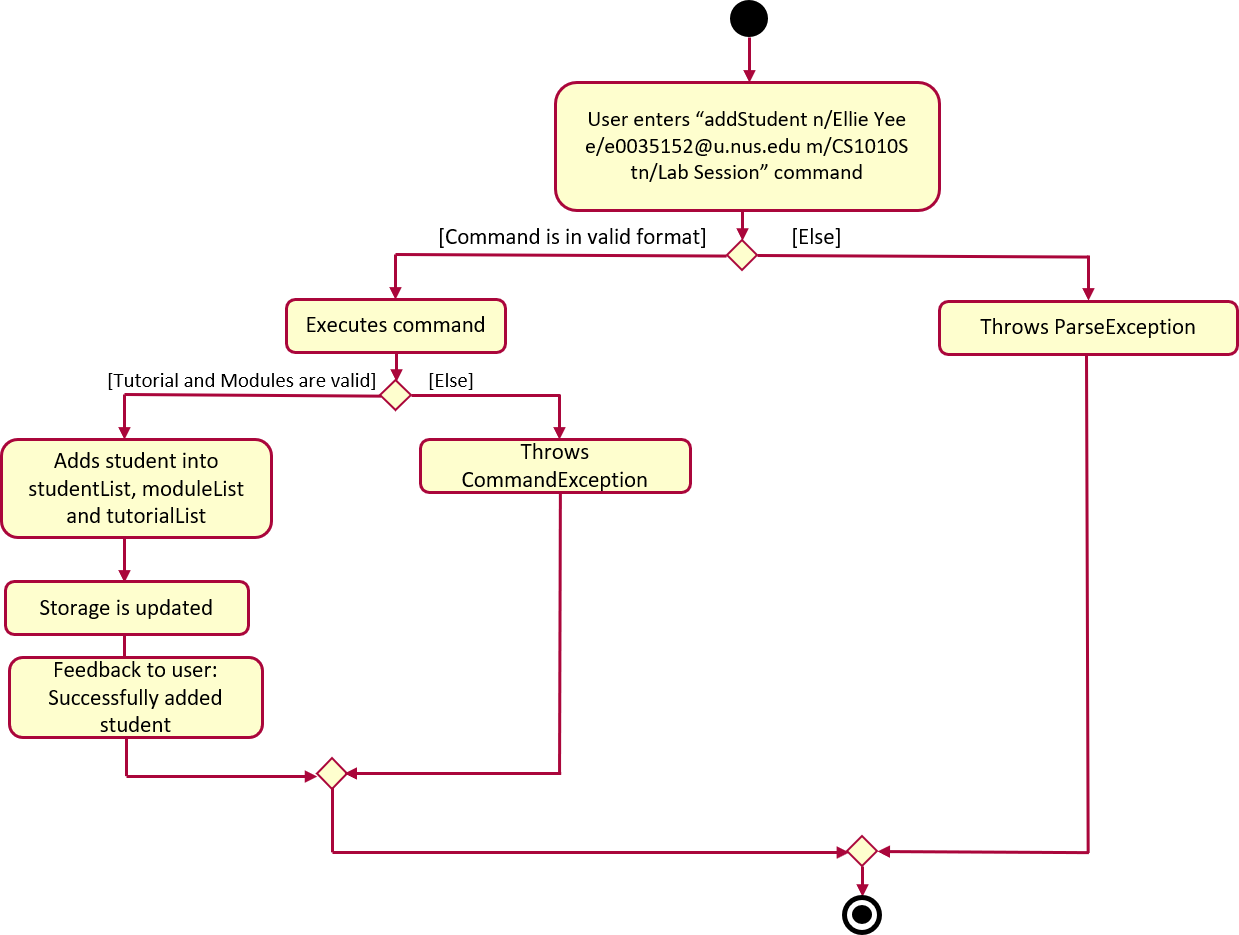
3.1. Add Student feature
The AddStudent command lets T.A.rence add a student into the specified module and tutorial.
3.1.1. Implementation
The AddStudent command must include the name, email, tutorial and module. The tutorial and module can be indicated by the index of the tutorial. Optionally, the user
can also choose to indicate the student’s matric number and nusnetid.
| If the user uses both the indexing and full input format, the command will throw an error due to ambiguity. |
-
The
AddStudentcommand will also automatically be updated within the application’s storage system and the new student will be reflected in the application’s GUI.
Below is an activity diagram shows the process of invoking the AddStudent command.
The sequence diagram below shows the interaction with the Logic components as described above.

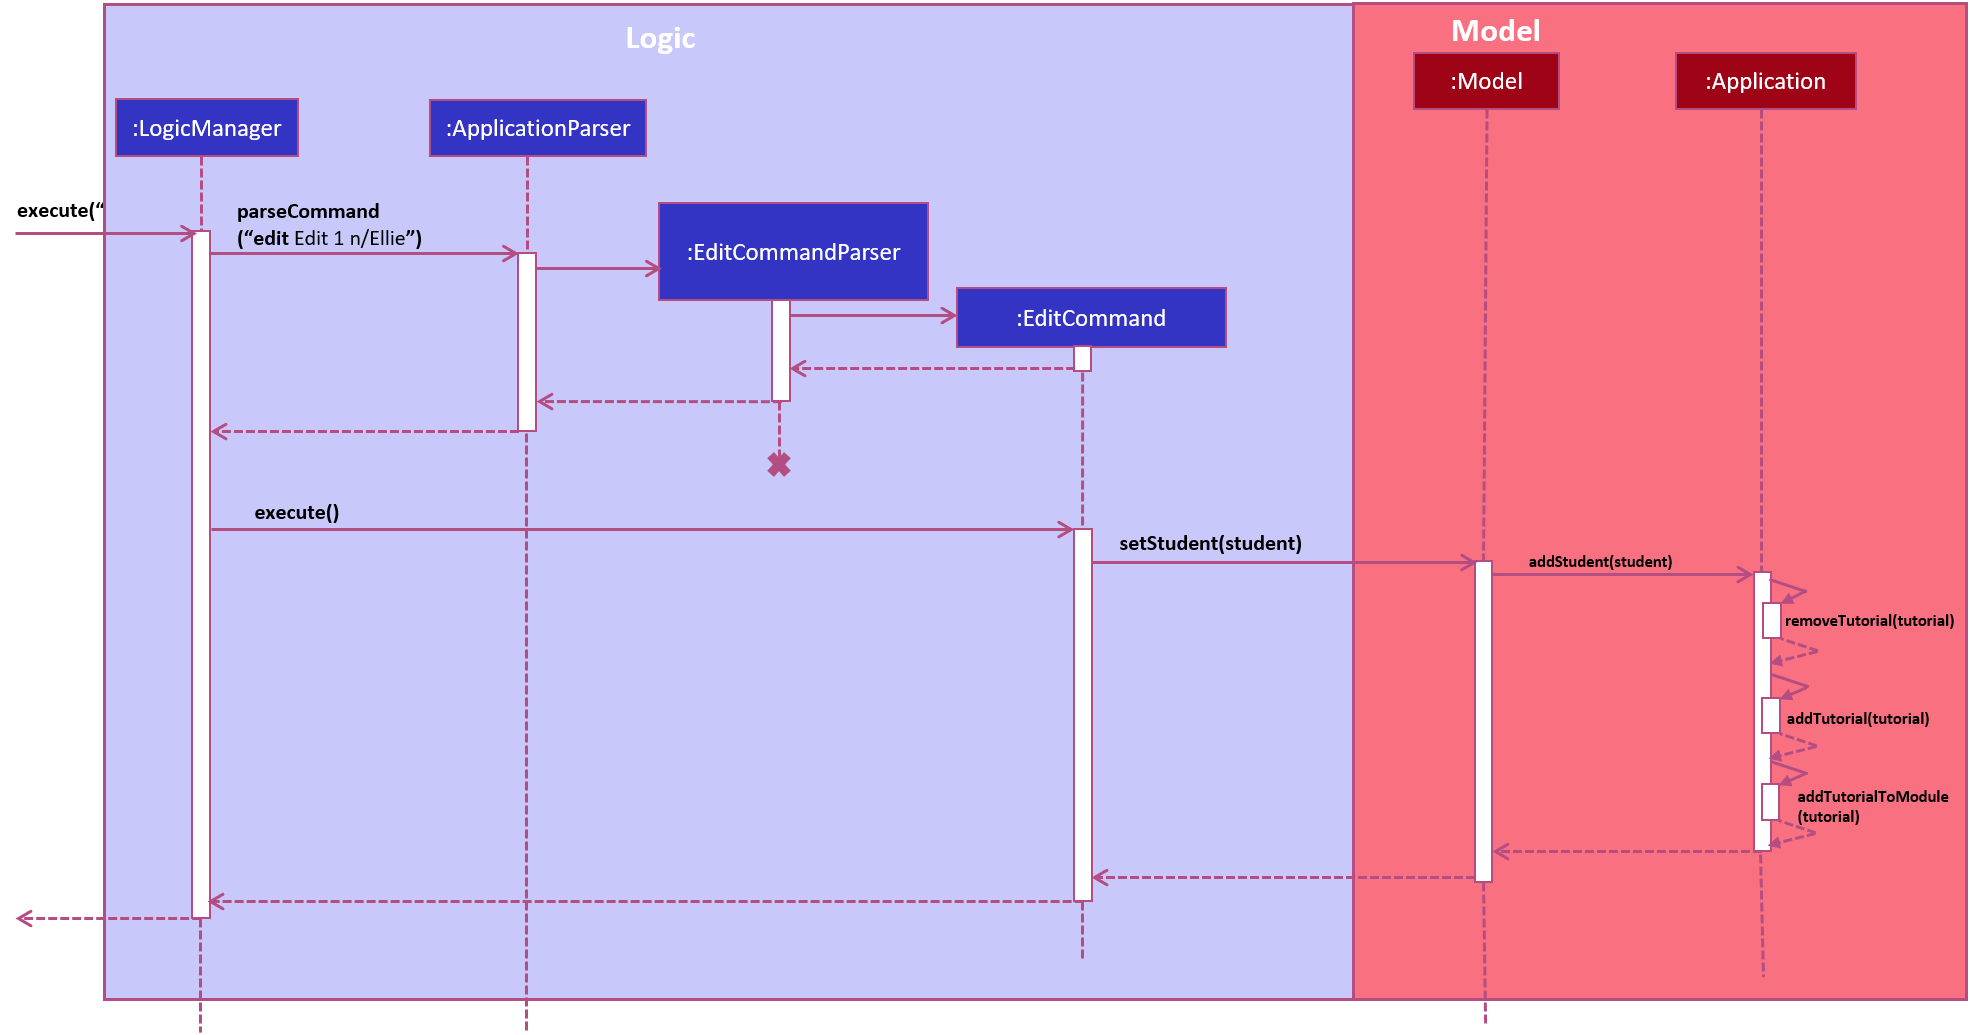
3.2. Edit feature
The edit feature aims to help users update student details in our application.
When there are changes to be made for a student (e.g. updating their email or adding a matric number),
users will want to be able to update their student’s details easily without going through the hassle of deleting and adding new student information.
3.2.1. Implementation
The edit command must include one of the following:
-
Name
-
Email
-
Matric number
-
NusnetID
| The user is not allowed to change the tutorial or module that the student is in. |
-
The
editcommand will also automatically be updated within the application’s storage system and the new student’s details will be reflected in the application’s GUI.
The sequence diagram below shows the interaction with the Logic components as described above.
3.2.2. Design Considerations
Aspect: How edit executes
-
Alternative 1 (current choice): Deletes old copy of and adds new modified copy
-
Pros: Easy to implement.
-
Cons: May have performance issues in terms of time complexity.
-
-
Alternative 2: Modify the existing version of the student directly.
-
Pros: Will use less memory
-
Cons: Will have to go through each of the student/tutorial/module lists and update them. Which involves many layers of looping (higher chance of regressions).
-
3.3. Autocorrect feature
Autocorrect lets T.A.rence find similar commands to the user’s input, allowing it to catch minor typing mistakes.
3.3.1. Implementation
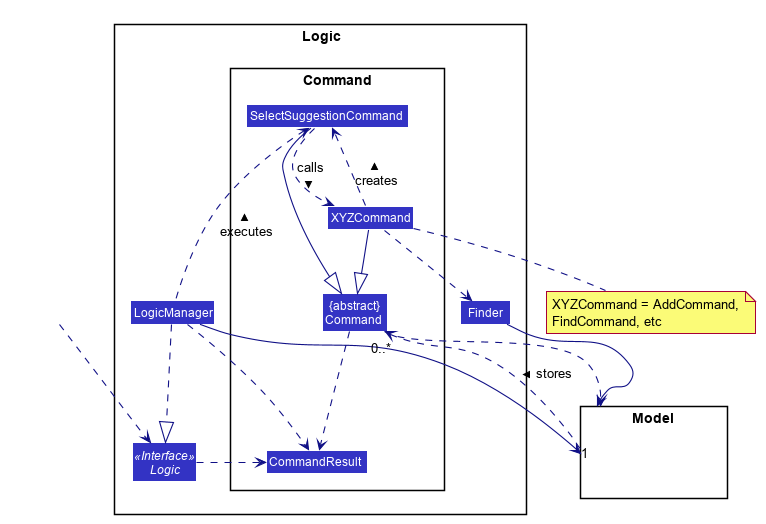
Autocorrect is implemented at the Command level: when Command objects are executed, they attempt to find their data values from the application’s storage. If these values are not found, they search for lexically similar alternatives, and construct new `Command`s with these suggested values. The user is then prompted to choose one of these suggestions via a single numerical input.
A new SelectSuggestionCommand is used to represent the user’s selection. Unlike other commands it has no keyword, and can only be triggered when there are existing suggested commands being temporarily cached. Should the user choose not to pick any of the options, the cached commands are deleted and can no longer be triggered subsequently.
Autocorrect is restricted to input fields that are not strictly numerical, since it makes no sense to correct, for example, index or time inputs.
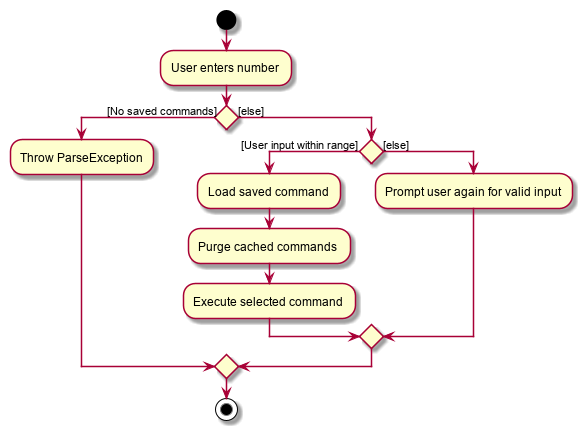
Below is an activity diagram showing the creation of suggested autocorrect commands when a command is executed.
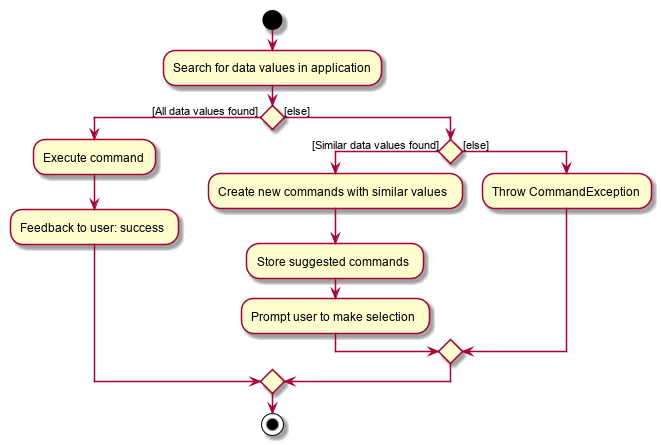
The suggested commands are presented to the user, each tagged with an index number. The user is prompted to select one option by entering its corresponding number.
When a valid option is selected, the execute() method in SelectSuggestionCommand retrieves the specified command, then calls its execute() method. The sequence diagram below illustrates a sample run of the program where `AddStudentCommand`s are being autocorrected.
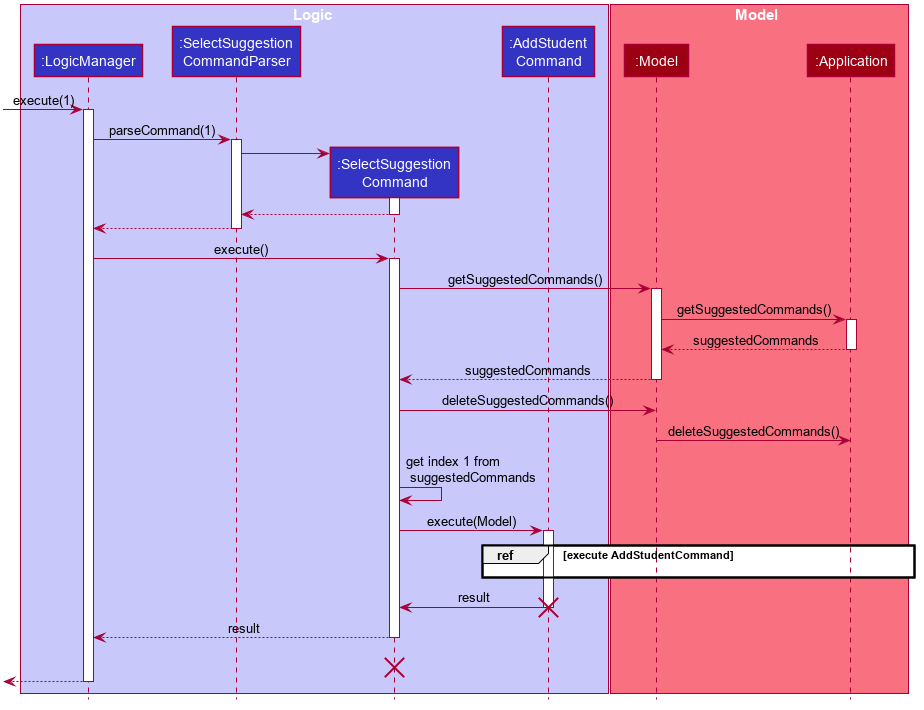
The lifelines for SelectSuggestionCommand and AddStudentCommand should end at their destroy markers (X) but due to a limitation of PlantUML, the lifelines reach the end of diagram.
=== Autocomplete feature
|
Autoomplete provides an autofill feature similar to that found in most common CLIs.
3.3.2. Implementation
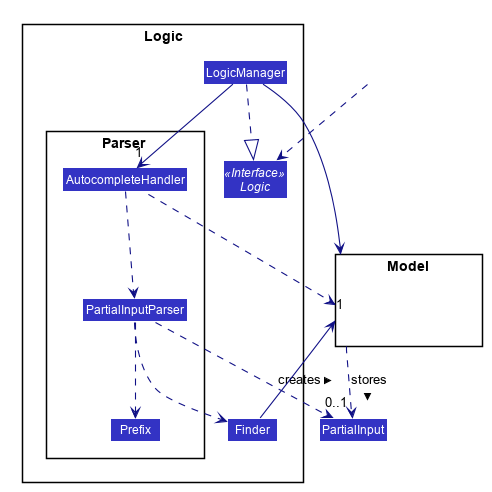
Autocomplete is implemented at the Parser level. When the user presses the "TAB" key, AutoCompleteHandler handles the processing of the input, as opposed to ApplicationParser when the "ENTER" key is pressed.
PartialInputParser#parse is responsible for the actual parsing of the input string. It calls ArgumentTokenizer#tokenizeLastArgument to find only the last present prefix and its associated value, then uses the appropriate method in Finder to get a list of all values corresponding to the prefix type in the application that begin with the detected partial input. Should this prefix be one not supported by Autocomplete (e.g. i/ for a purely numerical input), an error message is shown to the user.
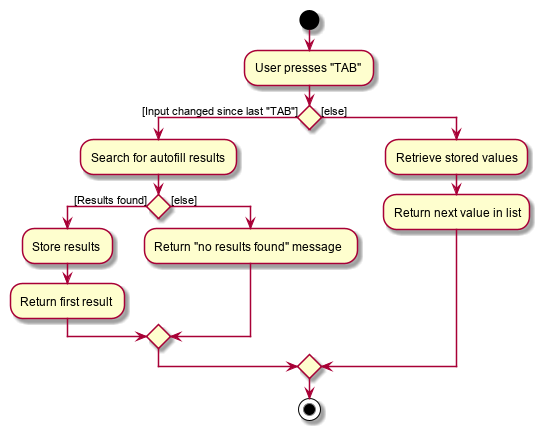
AutocompleteHandler#handle is responsible for determining the correct autofilled string. If the user presses "TAB" multiple times successively, it cycles through the available autofill options; otherwise, it gets the list of options from PartialInputParser and returns the first one. The activity flow is summarised below:
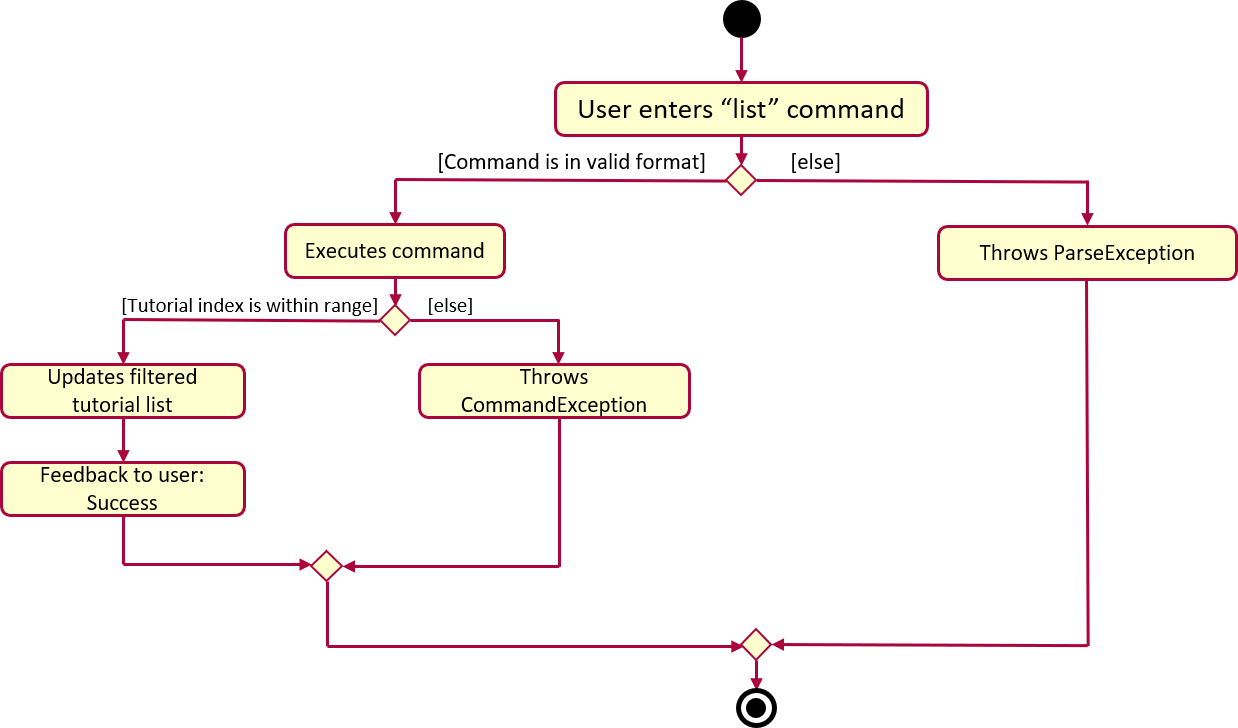
3.4. list feature
The list command lets T.A.rence display all students or students from a specific tutorial.
3.4.1. Implementation
The list command can include no additional input, or the index of the tutorial. When the user executes the list command, the following steps are taken by the application:
-
The CommandParser determines the format of user input. If not input is provided, all students are displayed.
-
When the
listclass is invoked, it will perform the following actions before displaying the output to the user: -
Obtains a list of tutorials from the model and filters through the students which belong to the indicated tutorial of choice.
Below is an activity diagram shows the process of invoking the list command.
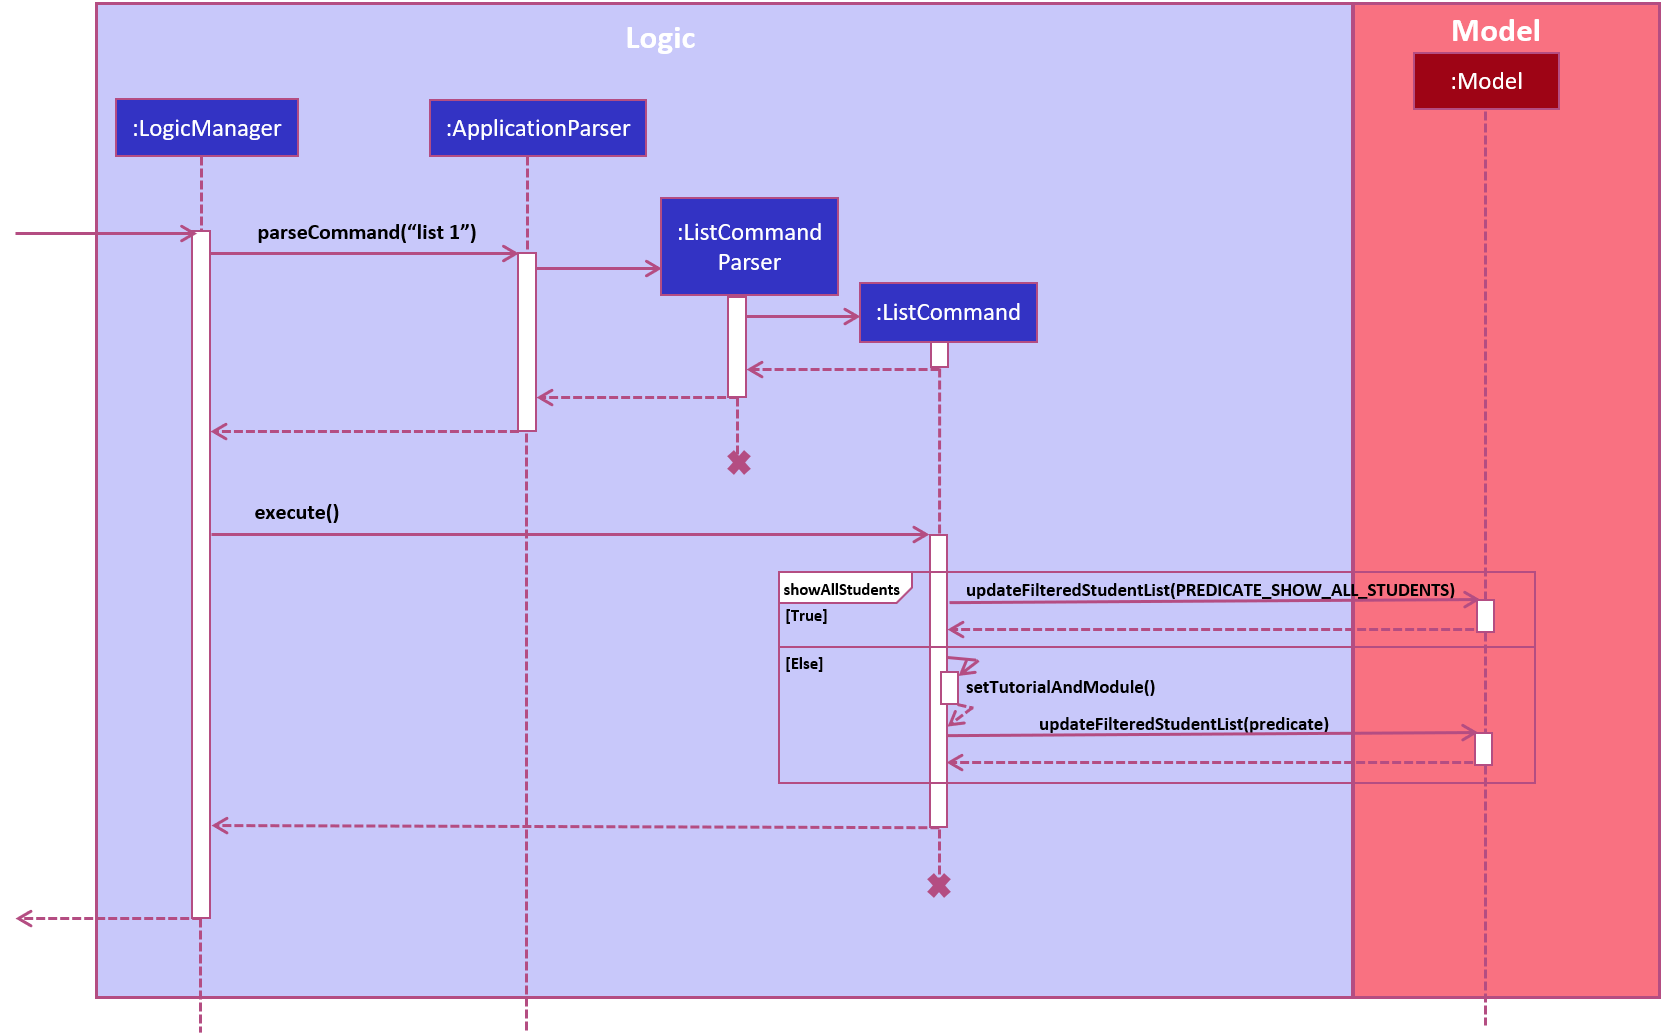
The sequence diagram below shows the interaction with the Logic components as described above.
3.5. Mark Attendance feature
The MarkAttendance command lets T.A.rence mark the attendance of a specified student in a tutorial.
3.5.1. Implementation
The MarkAttendance command must include the following:
-
The week of the tutorial
-
Tutorial name
-
Module code
Alternatively, the index of the tutorial can be used in place of the tutorial name and module code. Optionally, the user can also choose to indicate the student’s name.
| If the user uses both the indexing and full input format, the command will throw an error due to ambiguity. |
-
The
MarkAttendancecommand will also automatically be updated within the application’s storage system and the updated attendance will be reflected in the application’s GUI.
Below is an activity diagram showing the process of invoking the MarkAttendance command.
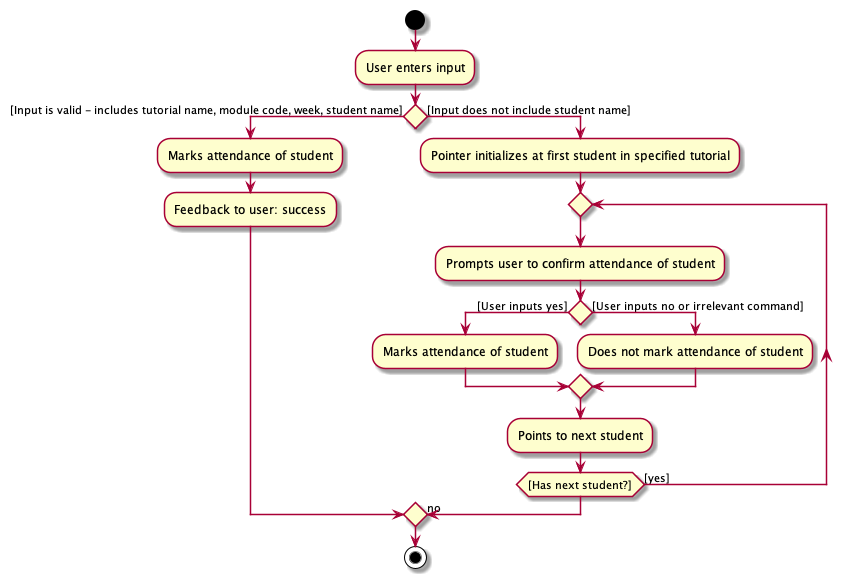
The MarkAttendanceCommand has two formats, the first with a student’s name specified and the other without. Specifying the student name will toggle the attendance of the student in the tutorial, while the other format will mark/toggle the attendance of the entire tutorial sequentially. For the second case, the application will prompt the user to mark/toggle the attendance of each student in the tutorial one by one. Errors will be thrown if the tutorial/module/student cannot be found, or if the week specified is invalid.
The sequence diagram below shows the interaction between the Logic componenents for marking the attendance of a single student.
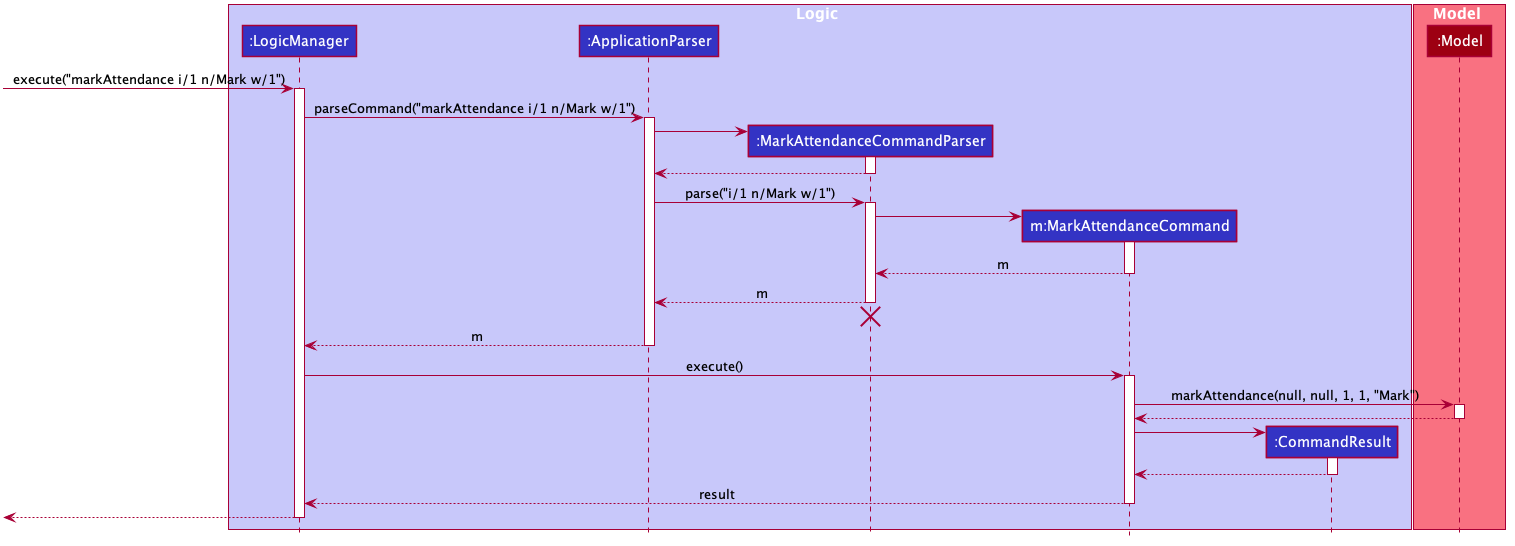
Entering the input will call the execute() method in LogicManager, which identifies the command as a MarkAttendanceCommand via ApplicationParser.parse(). MarkAttendanceCommand.parse() is then called to parse the input and extract the relevant information (tutorial name, module code, student name) which is used to initialize the MarkAttendanceCommand, which finally modifies the student’s attendance when executed.
3.6. Undo feature
The undo feature allows the user to undo multiple commands at once.
3.6.1. Implementation
The undo mechanism is facilitated by JsonStateStorage.
It extends TARence with an undo history, stored externally as a stateXX.json file
where 'XX' represents the sequential state of json files committed.
It relies on the following operations from Storage, exposed via the Storage interface.
-
Storage#isValidNumberOfRollbacks(Integer numberOfStatesToUndo)— Checks if the specified number of undo commands to execute is valid. -
Storage#getLatestStateIndex()— Obtains the largest state stored. Used to obtain the state number which is required. -
Storage#getSpecifiedState()— Obtains the required state to reset the model to. -
Storage#saveApplication()— Saves the application state intoapplication.json. This method additionally callsJsonStateStorage#saveApplication(), which is explained below.
It relies on the following operation from Model, exposed via the 'Model' interface.
-
Model#setModel(`ReadOnlyApplication)` — Resets the model to the supplied application state.
Additionally, it relies on the following operation from JsonStateStorage, not exposed via the Storage interface:
-
JsonStateStorage#saveApplication()— Saves the current application state to file if there is a change in state. The files are saved asstateXX.json, where the file name is chronologically generated. -
JsonStateStorage#stateStack— A private attribute, which keeps track of the current and previous states. Its implementation is similar to thecurrentStatePointerused in AB4.
These operations are exposed in the Model interface as Model#commitAddressBook(), Model#undoAddressBook() and Model#redoAddressBook() respectively.
Given below is an example usage scenario and how the undo mechanism behaves at each step.
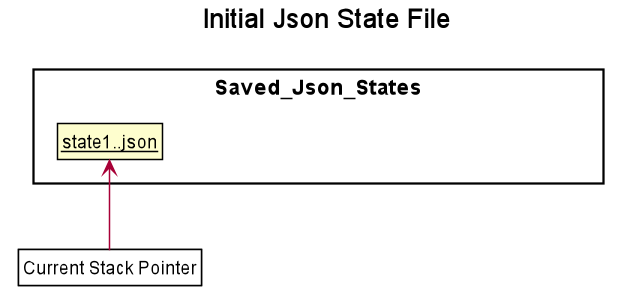
Step 1. The user launches the application for the first time. The JsonStateStorage will be initialized with the initial json file, state1.json and the stateStack will contain the value 1.
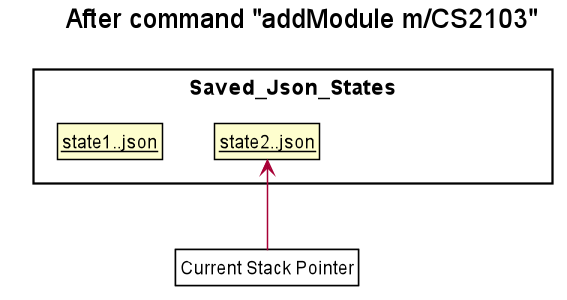
Step 2. The user executes addModule m/CS2103 command to add the module CS2103
in the application.
The addModule command calls Storage#saveApplication(), which calls
JsonStateStorage#saveApplication(),
causing the modified application state, after the addModule m/CS2103 command
executes, to be saved externally in the data/states folder.
The latest state number (stateStack.peek() + 1) is pushed onto the stack, which
corresponds with the json state file saved.
Step 3. The user executes addTutorial tn/Tutorial 01 … to add a new Tutorial. The addTutorial command also calls JsonStateStorage#saveApplication().
As JsonStateStorage#saveApplication() detects that there has been a state change with the latest saved state (state0.json),
the modified application
state is saved externally to the data/states folder.
The stateStack is correspondingly updated (The latest state number (stateStack.peek() + 1) is pushed onto the stack, which
corresponds with the json state file saved.)
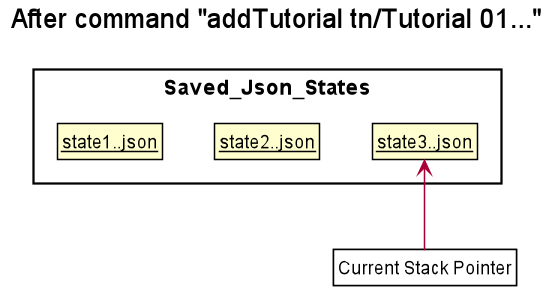
If a command fails its execution, it will not call storage#saveApplication(), so the
application state will not be saved.
|
Step 4. The user now decides that adding the tutorial, Tutorial 01 was a mistake, and decides to undo that action
by executing the undo command.
The undo command will first verify that the number of commands is valid by calling
storage#isValidNumberOfRollbacks.
If the number of undo commands is valid, it will call storage#getLatestStateIndex to
get the position of the current state pointer (which is the number on the top
of stateStack).
The undo command will then call storage#getSpecifiedState() to retrieve the desired
state to undo from. In storage#getSpecifiedState(), the internal stateStack will
pop the numbers until it gets to the required state number, to ensure that it
the "pointer" is at the correct state.
With the desired state retrieved, undo command will call model#setModel(application) to
reset the application to the retrieved state.

If the stateStack.peek() is at index / integer 0, pointing to the
initial application state,
then there are no previous application states to restore.
The undo command uses storage#isValidNumberOfRollbacks(number of states to undo)
to check if this is the case.
If so, it will return an error to the user rather than attempting to perform the undo.
|
The following sequence diagram shows how the undo operation works:
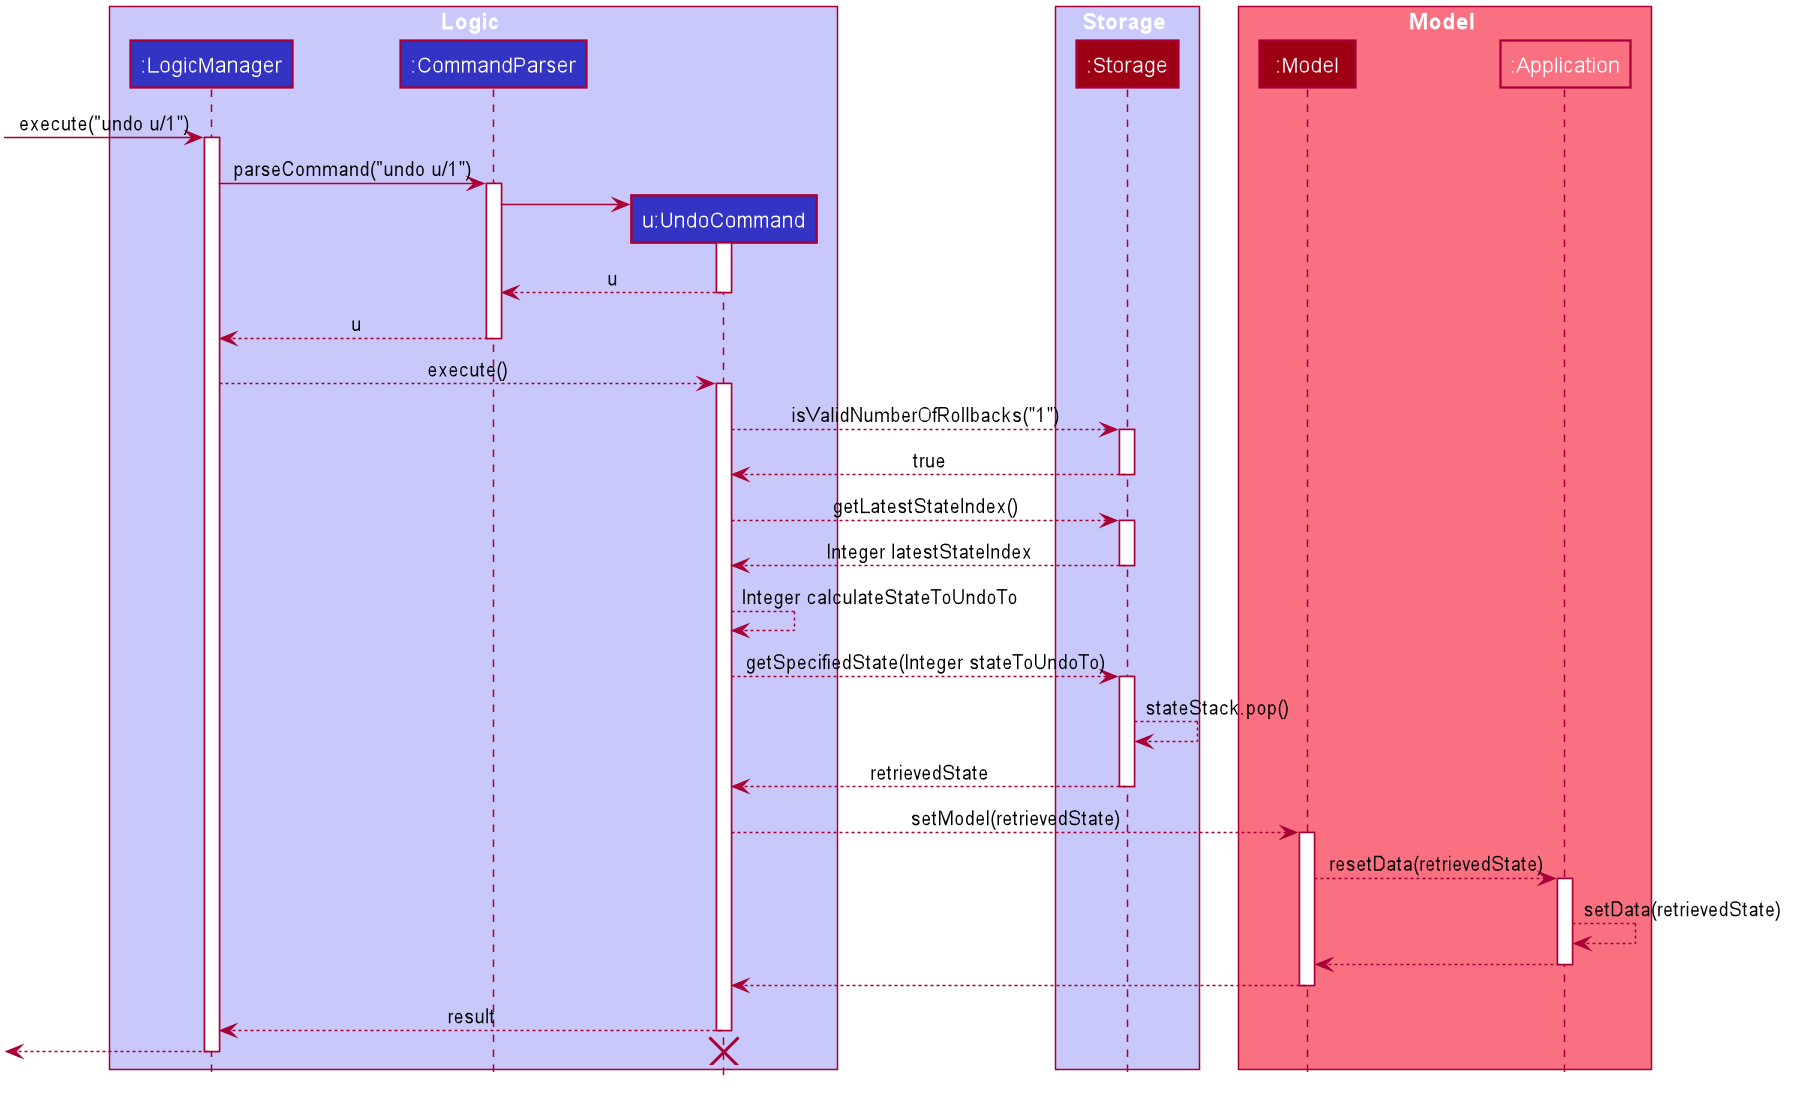
The lifeline for UndoCommand should end at the destroy marker (X) but due to a limitation of PlantUML, the lifeline reaches the end of diagram.
|
Step 5. The user then decides to execute the command listAssignments. Commands that
do not modify the address book, such as listAssignments, will not result in a saved state.
JsonStateStorage#saveApplication() is still called. However, since there is no change with
the previous state, JsonStateStorage#saveApplication() will not save the current application state.
The following activity diagram summarizes what happens when a user executes a new command:
3.6.2. Design Considerations
Aspect: How undo & redo executes
-
Alternative 1 (current choice): Saves the entire application state into Hard Drive.
-
Pros: Won’t result in performance issues if there are many states as it won’t use up valuable RAM.
-
Cons: May have performance issues when reading the file from Hard Drive if the json file is large.
-
Cons: Suppose that "undo u/50" is executed, from state 70. State 20 will be loaded into memory. Subsequent states (ie state 21 onwards) will only overwrite the already present state 21 file.
-
The redundant states are not deleted from the hard disk. Only references to those states ,which is in the stateStack, are removed. However this is a minor problem as once the application is closed or started, it will automatically clear any state files.
-
Alternative 2: AB3 suggested implementation: Saves the entire application state into RAM.
-
Pros: Easy to implememnt.
-
Cons: May have performance issues in terms of memory usage.
-
-
Alternative 3: Individual command knows how to undo/redo by itself.
-
Pros: Will use less memory (e.g. for
deleteTutorial, just save the tutorial being deleted). -
Cons: We must ensure that the implementation of each individual command are correct.
-
Aspect: Data structure to support the undo/redo commands
-
Alternative 1 (current choice): Use a stack to store the history of application states.
-
Pros: Eliminates redundancy as previous states not needed will be overwritten.
-
Cons: Leftover files of undone states are present in the hard drive.
-
-
Alternative 2 (better choice): Use a stack as in Alternative 1. When
undocommand is executed, in addition to popping the stack, the application will delete the corresponding json files. This reduces the likelihood of accidentally reading redundant data. -
Alternative 3 (AB3 choice): Use a list to store the history of address book states.
-
Pros: Easy for new Computer Science student undergraduates to understand, who are likely to be the new incoming developers of our project.
-
Cons: Logic is duplicated twice. For example, when a new command is executed, we must remember to update both
HistoryManagerandVersionedAddressBook.
-
-
Alternative 4: Use
HistoryManagerfor undo.-
Pros: We do not need to maintain a separate list, and just reuse what is already in the codebase.
-
Cons: Requires dealing with commands that have already been undone: We must remember to skip these commands. Violates Single Responsibility Principle and Separation of Concerns as
HistoryManagernow needs to do two different things.
-
3.7. [Proposed] Data Encryption
{Explain here how the data encryption feature will be implemented}
3.8. Logging
We are using java.util.logging package for logging. The LogsCenter class is used to manage the logging levels and logging destinations.
-
The logging level can be controlled using the
logLevelsetting in the configuration file (See Section 3.9, “Configuration”) -
The
Loggerfor a class can be obtained usingLogsCenter.getLogger(Class)which will log messages according to the specified logging level -
Currently log messages are output through:
Consoleand to a.logfile.
Logging Levels
-
SEVERE: Critical problem detected which may possibly cause the termination of the application -
WARNING: Can continue, but with caution -
INFO: Information showing the noteworthy actions by the App -
FINE: Details that is not usually noteworthy but may be useful in debugging e.g. print the actual list instead of just its size
3.9. Configuration
Certain properties of the application can be controlled (e.g user prefs file location, logging level) through the configuration file (default: config.json).
4. Documentation
Refer to the guide here.
5. Testing
Refer to the guide here.
6. Dev Ops
Refer to the guide here.
Appendix A: Product Scope
Target user profile:
-
has a need to manage a significant number of tutorial classes
-
prefer desktop apps over other types
-
can type fast
-
prefers typing over mouse input
-
is reasonably comfortable using CLI apps
Value proposition: manage TA-related tasks faster than a typical mouse/GUI driven app
Appendix B: User Stories
Priorities: High (must have) - * * *, Medium (nice to have) - * *, Low (unlikely to have) - *
| Priority | As a … | I want to … | So that I can… |
|---|---|---|---|
|
TA |
mark students attendance easily on computer |
not have to keep a physical record of it |
|
TA |
add a new student to my class |
easily track students without having to refer to LumiNUS |
|
TA |
delete a student |
stop referring to LumiNUS due to students periodically dropping classes |
|
TA |
track students' performance |
pay special attention to weaker students |
|
TA |
easily key in marks for assignments and mid-terms |
view statistics such as mean and help the outlier students |
|
TA with busy schedule |
keep track of my available slots |
know when to schedule consultations |
|
TA |
have a contact list of professors |
easily contact them |
|
TA overloading |
compare my personal timetable with the scheduled tutorial slots |
plan out any potential clashes |
|
TA |
share my schedules with my other TA friends |
assign a substitute TA if needed |
|
TA |
track all guest & students that crash |
remember to manually submit their attendance and/or assignments |
|
TA |
keep separate logs of the modules I taught for each semester |
retrieve any information from the previous semesters taught |
{More to be added}
Appendix C: Use Cases
(For all use cases below, the System is the T.A.rence application and the Actor is the TA user, unless specified otherwise)
Use case: New module entry
Pre-conditions: User selects the command to add a new module.
MSS
-
User requests to add a new module
-
System adds new module.
Use case ends.
Extensions
-
1a. The given module already exists.
-
1a1. System shows an error message that the given module already exists.
Use case ends.
-
-
1b. The given input is in an invalid format
-
1b1. System shows an error message showing the correct format to add a module.
User case ends.
Use case: New tutorial entry
Precondition: User selects the command to add a new tutorial.
-
MSS
-
User requests to add a new tutorial to a selected module.
-
System adds the tutorial to the given module.
-
System displays the newly added tutorial to the tutorial list.
Use case ends.
Extensions
-
1a. The given tutorial already exists.
-
1a1. System shows an error message showing that the given tutorial already exists.
Use case ends.
-
-
1b. The given module does not exist.
-
1b1. System searches for similar modules in the application to the given module.
-
1b1a. System finds one or more similar modules.
-
1b1a1. System suggests alternative values to user.
-
1b1a2. User selects one of the options.
Use case resumes from step 2.
-
-
1b1b. System finds no similar modules.
-
1b1b1. System shows an error message showing that the given module does not exist.
Use case ends.
-
-
-
-
1c. The given input is in an invalid format
-
1c1. System shows an error message showing the correct format to add a module.
User case ends.
Use case: Deleting tutorials
Precondition: User selects the command to delete a tutorial.
-
MSS
-
User requests to a delete a tutorial of a given index.
-
System deletes the tutorial.
-
System displays a confirmation message of the deletion.
Use case ends.
Extensions
-
1a. The entered index is out of range.
-
1a1. The system displays an error message and alerts the user that their input is out of range.
Use case ends.
-
-
1b. The entered value for the index is negative, or not a parsable integer.
-
1b1. System displays an error message along with a prompt on the correct command usage.
Use case ends.
-
-
1c. The tutorial to be deleted contains one or more students.
-
1c1. System displays a message informing the user that the tutorial is not empty, and prompts for confirmation.
-
1c2. User confirms the delete action.
Use case resumes from step 2.
Use case: New student entry
Precondition: User selects the command to add a new student.
-
MSS
-
User requests to add a new student into the selected tutorial and module.
-
System adds the new student into the selected tutorial and module.
-
System displays the student’s particulars under the student list.
Use case ends.
Extensions
-
1a. The given student already exists.
-
1a1. System shows an error message that the given student already exists within the selected tutorial and module.
Use case ends.
-
-
1b. The given module or tutorial does not exist.
-
1b1. System searches for similar module-tutorial combinations in the application to the given module and tutorial.
-
1b1a. System finds one or more similar combinations.
-
1b1a1. System suggests alternative values to user.
-
1b1a2. User selects one of the options.
Use case resumes from step 2.
-
-
1b1b. System finds no similar combinations.
-
1b1b1. System shows an error message showing that the given module or tutorial does not exist.
Use case ends.
-
-
-
-
1d. The given input is in an invalid format.
-
1d1. System shows an error message showing the correct format to add a module.
User case ends.
Use case: Editing a student’s particulars
Precondition: User selects the command to edit a student.
-
MSS
-
User requests to edit the particulars of a given student.
-
System edits student particulars.
Use case ends.
Extensions
-
1a. The given student does not exist.
-
1a1. System shows an error message that the given student does not exist.
Use case ends.
-
-
1b. The given input is in an invalid format.
-
1b1. System shows an error message showing the correct format to add a module.
User case ends.
Use case: Deleting a student
Preconditions:
-
Given tutorial and module exists in the system.
-
User selects the command to delete a student.
-
-
MSS
-
User request to delete a student from a particular tutorial and module.
-
System deletes student and shows confirmation.
Use case ends
Extensions
-
1a. The given student does not exist.
-
1a1. System shows an error message that the given student does not exist.
Use case ends.
-
-
1b. The given input is in an invalid format.
-
1b1. System shows an error message showing the correct format to add a module.
User case ends.
Use case: Listing students
Preconditions:
-
Given module exists in the system.
-
User selects the command to list students of a particular tutorial class.
-
-
MSS
-
User requests to list a given selected tutorial class.
-
System displays the class list for a given tutorial.
Use case ends.
Extensions
-
1a. The given tutorial does not exist.
-
1a1. System shows an error message that the given tutorial does not exist.
User case ends
-
-
1b. The given input is in an invalid format.
-
1b1. System shows an error message showing the correct format to add a module.
User case ends.
Use case: Mark class attendance.
Preconditions:
-
User selects the command to mark a tutorial class' attendance.
-
The given tutorial-module combination exists in the system.
-
-
MSS
-
User requests to enter attendance for a student in a particular tutorial and module for particular week.
-
System records attendance for the student.
-
System displays confirmation message.
Use case ends.
Extensions
-
1a. No student name is supplied.
-
1a1. System displays a student in the tutorial and prompts user to mark attendance for that student.
-
1a2. User enters attendance for displayed student.
Steps 1a1 and 1a2 are repeated for each student in the tutorial.
Use case ends.
-
-
1b. The given input is in an invalid format.
-
1b1. System shows an error message showing the correct format to add a module.
User case ends.
Use case: Adding in hours clocked.
Preconditions:
-
User selects the command to add in the hours.
-
Given module exists in the system.
-
-
MSS
-
User indicates the tutorial class that has been completed for the week.
-
System adds the given hours to the tutorial slot
-
System displays response on the total number of hours clocked for the given tutorial
Use case ends.
Extensions
-
1a. The given tutorial does not exist.
-
1a1. System shows an error message that the given tutorial does not exist.
Use case ends.
-
-
1b. The hours of the tutorial class for that week has already been clocked.
-
1b1. Application shows an error message that the class already has its hours clocked for that week
Use case ends.
-
-
1c. The given input is in an invalid format.
-
1c1. System shows an error message showing the correct format to add a module.
User case ends. === Use case: Adding and viewing assignment score to students Preconditions
-
User selects the command to add assignment and its' scores to the student.
-
Given module and tutorial exists in the system.
-
-
MSS
-
User adds assignment to the tutorial class in the module.
-
User adds the score for each student for the assignment.
-
User switches to the student performance window.
-
System displays results across semester for each student.
Extensions
-
2a. One of the students does not exist.
-
2a1. System shows an error message that the given student does not exist.
-
Steps 2-2a2 are repeated for all invalid students.
Use case resumes at step 2
-
{More to be added soon. Stay tuned!}
Appendix D: Non Functional Requirements
D.1. Business/Domain Rules:
-
System should be able to handle multiple modules and tutorials
-
Number of module and tutorial slots created should be of reasonable amount (< 10)
-
The application’s functionalities should be easily testable.
D.3. Technical Requirements:
-
Should work on any mainstream OS as long as it has Java
11or above installed.
D.4. Performance Requirements:
-
System should be able to hold up to 100 students without a noticeable sluggishness in performance for typical usage.
D.5. Quality Requirements:
-
A user with above average typing speed for regular English text (i.e. not code, not system admin commands) should be able to accomplish most of the tasks faster using commands than using the mouse.
-
The application should work even if the user enters partial commands/data and data in different formats, or omits certain command prefixes.
-
Product should be usable by someone who just became a Teaching Assistant.
D.6. Notes about Project Scope:
-
System does not need to handle exporting or importing of data from other programs.
{More to be added. Coming to stores near you!}
Appendix E: Glossary
- Mainstream OS
-
Windows, Linux, Unix, OS-X
- TA
-
teaching assistant
- module
-
A module that comes with an associated code in the form of [XXX1234Y]
- tutorial
-
A tutorial class conducted by a TA
- Private contact detail
-
A contact detail that is not meant to be shared with others
- Command-Line Interface
-
An interface that only requires textual inputs.
- Graphical User Inferface
-
An interface that requires the use of graphics such as the use of the mouse pointer.
Appendix F: Product Survey
Product Name
Author: …
Pros:
-
…
-
…
Cons:
-
…
-
…
Appendix G: Instructions for Manual Testing
Given below are instructions to test the app manually.
| These instructions only provide a starting point for testers to work on; testers are expected to do more exploratory testing. |
G.1. Launch and Shutdown
-
Initial launch
-
Download the jar file and copy into an empty folder
-
Double-click the jar file
Expected: Shows the GUI with a set of sample contacts. The window size may not be optimum.
-
-
Saving window preferences
-
Resize the window to an optimum size. Move the window to a different location. Close the window.
-
Re-launch the app by double-clicking the jar file.
Expected: The most recent window size and location is retained.
-
{ more test cases … }
G.2. Deleting a person
-
Deleting a person while all persons are listed
-
Prerequisites: List all persons using the
listcommand. Multiple persons in the list. -
Test case:
delete 1
Expected: First contact is deleted from the list. Details of the deleted contact shown in the status message. Timestamp in the status bar is updated. -
Test case:
delete 0
Expected: No person is deleted. Error details shown in the status message. Status bar remains the same. -
Other incorrect delete commands to try:
delete,delete x(where x is larger than the list size) {give more}
Expected: Similar to previous.
-
{ more test cases … }
G.3. Saving data
-
Dealing with missing/corrupted data files
-
{explain how to simulate a missing/corrupted file and the expected behavior}
-
{ more test cases … }